Saturday, October 30, 2010

Rollercoaster; which is your fav?


When you go to an amusement park such as Canada's Wonderland, what is the first roller coaster you rush to? Your absolute favourite ride in the whole park. Well, my favourite roller coaster is Behemoth. I just love the idea of a really big and fast roller coaster. Although I would have loved it even more if it had loops in it, but because of the way it is built, having loops would be dangerous and impossible. Some are terrified of roller coasters, and some enjoy them very much, but has anyone ever stooped and thought how a roller coaster really functions? Well, since we are required to build a roller coaster in class, we must first think of the physics side of the matter, and then the entertainment part. Knowing Newton's laws are essential in building a roller coaster.
Newton's first law, law of inertia, states: '' all objects will remain in a state of rest or continue to move with a constant velocity unless acted upon by an unbalanced force.''
Newton's second law states: '' the acceleration of an object depends inversely on its mass and directly on the unbalanced force applied to it.''
Newton's third law states: ''for every action force, there is an equal and opposite reaction force.''
Using these laws, we can conclude that when the roller coaster is being pulled up the track with a chain, Newton's first law applies. When the roller coaster is in motion, from the second it is in free fall until it comes to a stop, the weight of the riders and the actual ride will impact its acceleration, which is Newton's second law. And the third law is displayed when the roller coaster is going up and against gravity, it eventually has to come down, towards it.
This goes to show that the saying ''what goes up must come down'' is a very true statement indeed.

-Peggy.

Tuesday, October 26, 2010

Who knows how to add vectors?

Hello there. This week in class we have been learning how to add vectors, and let me tell you, its actually not that hard once you get your head wrapped around the concept and you do a lot of questions. Here is a question that was on the green sheet Mr. Chung gave us.
A+D
The first thing you do is to draw the direction of the positive arrows. It should look like this.


Then you need to figure out the values for x and y of the diagonals.
Ax+Ay+Dx+Dy
= Ax+Dx + Ay+Dy
= 11.5km[E] + 18km[W] + 9.6km[S] + 1.6km[N]
11.5 and 18 represent Rx and 9.6 and 1.6 represent Ry
A simple way to add these together is to add the directions opposite of each other together. First you have to turn them into one unit. For example, going a certain distance towards North is the equivalent of going that same distance South, because they will cancel each other out. The same with going a certain distance East and going back the same distance West. In this case, if you want to add 11.5km[E] + 18km[W] , you need to subtract 18km[W] from 11.5km[E] and keep the [W] sign.
The answer would be Rx= 6.5km[W].
You could also subtract the East direction from the West, but then would have to keep the East sign.
Similarly, you would do the same for North and South.
9.6km[S] + 1.6km[N]
= 1.6km[N] - 9.6km[S]
= -8
Ry= 8km[S]
(Keep in mind that the negative sign does not change the number, it simply shows the direction. If it is negative, it means it is going in the opposite direction)

You then use the Pythagorean theorem to find the hypotenuse:
R=
R= 10.3

Lastly, you use trigonometry to find the angle.
tanθ =opp/adj
= 6.5/8
θ= tan -1 (6.5/8)
θ = 39˚

You now have all the missing pieces, and need to simply put them together.
R= 10.3 [S 39˚ W]

Here is what the triangle would look like.


-Peggy.

Sunday, October 24, 2010

Maja, Faja and children!

Hello there. Last week in class we learned five new equations called the Big 5, each interlocked with one another. Here are the five equations we learned:
1) The DAD at=V2-V1
2) The MOM d= ½(V1+V2)Δt
3) First CHILD d=V1t + ½at²
4) Second CHILD d=V2t - ½at²
5) Third CHILD V2²= V1²+2ad

From these five equations, you must also be able to derive them from a graph. In order to get equation 3, you must find the area of the small triangle from the graph and the area of the rectangle and add them together.
Area of a triangle: d= 1/2 (V2 -V1 )t
Substitute (at) for (V2-V1) of equation 2.
d= 1/2 (at)t + V1 t
d= 1/2 a t2 + V1 t
d= V1 t + 1/2 a t2


In order to get equation 4, you must subtract the area of the triangle on top, from the large rectangle.
d= V2 t - 1/2 (V2 -V1 )t
Substitute (at) for (V2 -V1 ) of equation 2
d= V2 t - 1/2 (at )t
d= V2 t - 1/2 a t2


Once you have fully understood these methods, you will be ready to tackle future tasks that come your way!
Thanks,

-Peggy.

Tuesday, October 12, 2010

You have to walk it to learn it!

Hi there. It has been a while since I have written in my blog, but I can assure you I have not missed any important events to blog about. Before the wonderful Thanks giving long weekend, we did a very interesting activity in class, in our groups. We had learned slightly about d-t and v-t graphs, however the activity we did on Friday further expanded on what we had learned. We got to actually walk the graphs for ourselves so we could learn better. We also kept track of the six graphs we walked, and I will do my best to explain them as best as possible.

In a d-t(distance, time) graph, if you walk at a constant speed away from the sensor, you would get a positive slope pointing upwards from the origin. If you walk towards the sensor at a constant speed, your line would be a negative slope going downward away from the origin. If you do not move, it will appear as a horizontal line. Here are the three d-t graphs.


In a v-t (velocity, time) graph you can spot a relationship between the d-t and v-t graph. There are many directions you can consider when there is a change in speed. Depending on the direction you are walking, the line will slope upward or downward. When walking at a constant speed, you would get a straight horizontal line. If the line happens to be located at 0, it means that there is no movement at all. Here are the three v-t graphs we walked.


Make sure you know all these graphs and their relationships for upcoming tests!
Thanks,

-Peggy.

Saturday, October 2, 2010

Does your motor work?

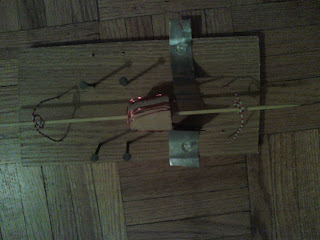
Every week class gets more and more interesting! This week in class we got into partners and had to build a motor, which I would like to add was very fun. My partner and I spent a period building a motor, as did everyone else, and were able to test it at the end of the period. Sadly it did not work the first time, so we took it back, made some adjustments and tried again. And guess what? It failed the second, third and fourth time too. We could not figure out what was wrong with it. We had followed all the instructions on our sheet, and our motor looked like everyone else's. Sadly the period had come to an end, so we had to wait until the next day, Friday, to test our motor again. The materials that we used to make our motor were: a pop can which we cut into strips and sanded, copper wire with sanded ends, nails, wood, bamboo skewers, cork, paperclips and a piece of wood to place our project on. We first got 30 minutes to do all the nailing to the wood, which were 2-3 cm wide and 5cm long, to create a rectangular shape. Then we bended the paper clips so as to create a loop on either side for the bamboo skewer to slid in and rotate. After that, we wrapped the cork in wire, making sure it was going in one direction, and inserted the skewer into it. Once that was taken care of, we nailed two nails into one end of the cork. Then we sanded both sides of the pop can and cut it into two long strips and we attached each to one side of the wood, in between the nails and the paperclip. The skewer was held up with the help of the paper clips. After that, all we had to do was make sure the nails on the cork were touching the two aluminum strips, and we were ready to test! After that you know what happens, but it is the thought of making a motor that counts right? Everyone had so much fun making the motors, and one group even burned theirs (on purpose) after they were done testing it. We learned a lot by doing this activity and hopefully there will be more to come.
Here are some pictures of what my partner and I's motor looked like.

Thanks,

-Peggy.